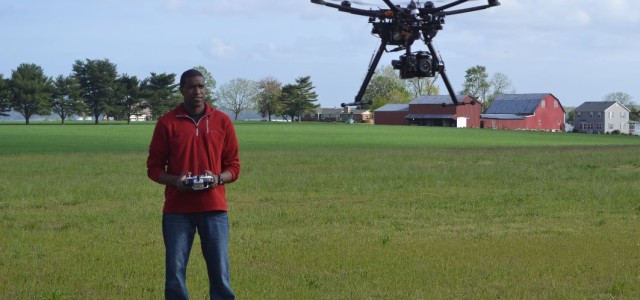
Are you interested in aerial photography? Do you seek out the latest and greatest in technology? Does the idea of soaring effortless through the sky like a bird intrigue you? If the answer to these questions is yes then look no further than the DJI S800. DJI’s Spreading Wings S800 is a hexacopter aircraft developed for professional aerial photography, videography, experienced model enthusiasts and can even be used for search and rescue.
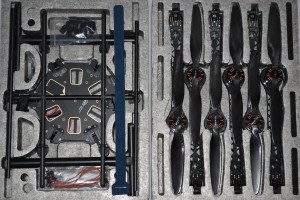
For my leap into this new and exciting world of RC flying I started with the DJI F550 Flame Wheel Hexacopter (six motors on the same level with three sets of CW and CCW props). I have a lot of RC experience with planes and helicopters so I felt comfortable starting with that middle of the road setup. When I was comfortable with the F550 and its equipment I felt ready to move up in size and complexity to the S800. For those just getting into RC I would suggest a tricopter or quadcopter (three and four rotors respectively), which are slightly less complicated and less expensive. Once you’ve got the hang of those aircraft you’ll want to start advancing as well. The ARF kit includes one complete center frame, six arms with imbedded power and signal wires for the 4114 320kv motors, 40a Opto ESCs, LED indicator and landing gear. Unlike other Hexacopter there are no unsightly wires protruding from the arms which adds to its professional appearance.
The S800 comes complete with everything needed to get into the air quickly, just add your own receiver and battery.
S800 Spreading Wings Each arm comes preassembled with the 15×4 carbon fiber propeller installed. The arms have a unique slot design which attach to the center frame with a locking system completely concealing the contacts to the arms for the motors, this makes the overall design safe, reliable, and allows for quick setup and breakdown before and after flights.
The included landing skids are made of high strength carbon fiber and are just as easy to breakdown as the arms. Also included in the box are various pieces of hardware for assembling the landing skids, Velcro battery straps, servo cables and a battery tray. The center frame contains all the circuitry for the batteries and electronic components of the arms, flight controller and gimbals. This setup simplifies the wiring, reduces the possibility of malfunction and allows for the quick connections of the arms. DJI recommends using the WooKong-M (WK-M) flight controller, which I did, although the DJI Naza-M or a flight controller of your choosing can be used.
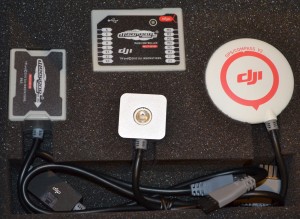
WooKong-M DJI’s WK-M stabilization controller is a complete flight system for all multi-rotor platforms for commercial and industrial aerial photography applications. It utilizes high quality components precisely calibrated with temperature compensation in all gyros and sensors, advanced flight algorithms, and an Inertial Measurement Unit (IMU) damping system rated for gas engines.
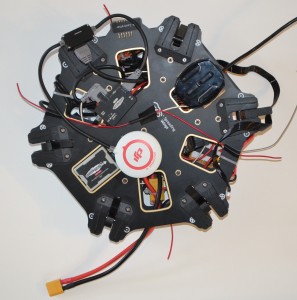
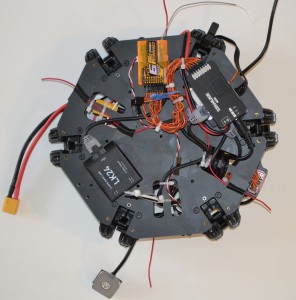
The WK-M consists of the Main flight Controller (MC), IMU, GPS module, Power Monitoring Unit (PMU) and LED unit. The MC is the brains of the system; it controls the IMU, GPS/compass, ESCs and receiver which all work together to form the Autopilot. The MC also provides the USB interface for connecting a Personal Computer (PC) for setup and upgrades of firmware via the DJI Assistant software. The IMU includes a 3-axis accelerometer, a 3-axis angular velocity and a barometric altimeter. These are used to recognize attitude and help with the incredible stabilization of the S800. The GPS module has an imbedded digital compass which feeds position and direction into the autopilot. The PMU is specially designed for the high power consumption of the system. It contains two power outputs for the system and receiver, a battery voltage monitor, and two CAN-Bus (Controller Area Network) interfaces. The LED unit indicates different states of system and is the pilot’s main visual indication of battery status.
There is a position reserved in the center frame for the installation of the WK-M IMU. The center frame also has the WK-M to motor connectors clearly numbered, which helps the user to install the autopilot system quickly and correctly. Once all the internal equipment is installed the top and bottom main frames are screwed together and held tight with Loctite.
Programing the WK-M is accomplished via the included USB cable which is plugged into the MC and a PC. I downloaded the latest assistant software from the DJI website and was prompted to update the firmware to version 5.20. Setting up the WK-M using the software requires the use of the 55-page user manual, which needs to be downloaded from the DJI website. The GPS and IMU locations are measured in centimeters from the center point of the center of gravity, which is most cases, will be the center of the S800. All three axis are input as either positive or negative numbers as instructed on the diagram. Note that the Z axis for the GPS will most likely be a negative number; most people assume this to be a positive number because it is located above the center frame, but this assumption is incorrect. The programming was straight forward and quick, reading the manual ahead of time really paid off here.
The WK-M controller has three flight control modes: Atti., GPS Atti., and Manual Mode. Pilot inputs will always override the auto-corrections. Atti. Mode will only provide attitude stabilization and is best used when you want to “sport fly”. The GPS Atti. Mode locks the position of the S800 and will provide auto-correction to maintain its current location and attitude. This is the best setting if you plan on using the S800 for photography or videography. Manual Mode provides no attitude-angle limitation or position locking.
The WK-M incorporates many safety features, to include safe motor start, return home, LED status indicator, adjustable height and range limits and what I like to call Damage Control Technology (DTC). With DTC the WK-M can still control the attitude of the S800 for a safe landing when one motor output has failed, for example, one motor has stopped or one propeller is broken, etc. The aircraft will still rotate, due to an imbalance of torque; however, it can still be controlled by the pilot. Selecting Course lock or Home lock mode while flying will allow you to move the aircraft in the corresponding transmitter stick direction, even while its rotating.
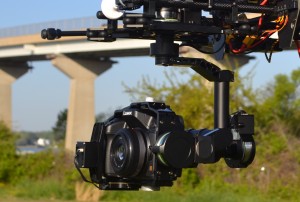
Zenmuse Z15-G The 3-axis Zenmuse Z15 Panasonic GH2 camera gimbal system has been designed for professional filming, aerial photography and commercial use. Its design, mechanical structure & construction give it a high level of precision, which provides very smooth pictures and videos even when the aircraft is in high-speed flight. The slip rings inside the gimbal along with integrated wires of the power and signal lines allow the Z15 to rotate continuously 360 degree horizontally and vertically.
In order to get the best performance out of the gimbal, DJI provides several variants of the Z15 according to the types of camera that will be used. There are currently two types of camera directly supported, the Sony Nex5/7 and Panasonic GH2. If you want to use a different type of camera, you’ll need to purchase additional accessories to make it fit. Since I was using the new Panasonic GH3 I needed to purchase a GH2 to GH3 converter made by Secraft.
The Gimbal Control Unit (GCU) is a separate controller supplied with the Z15 and is connected by the CAN wires to the WK-M’s MC. The GCU uses the WK-M to auto correct for aircraft movement in roll, pitch and yaw. A video output module with expanded features like camera shutter and customized HDMI signal to AV converter is imbedded into the Z15 body; this once again keeps the external wires to a minimum and ensures the smooth and free movement of the 3 axis gimbal. The GCU also houses a small LED which indicates whether the camera and gimbal are connected or disconnected to the WK-M MC.
The Z15 is driven by DJI’s ultra-precise, low vibration, high torque gimbal servo drive module. Controlling the Z15 3-axis rotation function is quite simple. A separate receiver can be connected to the Z15 which can them be controlled by a second radio. This is the most common setup for professional use. The Z15 can also be operated by a single user via radio knobs, sliders or switches. When operated with a second transmitter the stick range corresponds with rotation speed of the gimbal axis. The control algorithms of the Z15 gimbal ensure the rotation speed will not be influenced by aircraft movement even while during high-speed turns, spinning or rapid climbs and descents.
The Z15 has three control modes: Orientation-locked mode, Non Orientation-locked mode and Back to Mid-point mode (Horizontal mode). The three types of modes can be switched quickly from one mode to another via the transmitter to meet the changing requirements of the aerial photographer. Another neat feature of the Z15 is the pilot or camera operator can control the shutter from the transmitter via a two-position switch.
Balancing the Z15 to work with your specific camera and lens is critical if you want to get high quality video. It is also import for the longevity of the Z15; a balanced camera translates to less strain on the servos, which equates to a longer life of the system.
Balancing the Z15 is not difficult but it is tedious. Unfortunately the manual comes up short here and doesn’t explain how to do this. This is because the Z15 comes pre-balanced from the factory; since I’m using a Panasonic GH3 and not the GH2 the Z15 was not balanced. Luckily there are user-made instructional videos on YouTube and Vimeo, so take your time and do it right the first time, it will pay off in the end product. The Z15 is programmed and updated via an included USB cable via the GCU.
Retractable Landing Gear The retractable landing gear has been designed specifically for use with the S800 for the professional aerial photographer and experienced model enthusiasts in mind. With the landing skids retracted the Z15 now has the freedom to rotate through the full pan axis of 360 degrees without any viewing obstructions. This also allows for a solo pilot to simply lock the S800 in GPS position hold and operate the camera without needing to pay attention to “yawing” the aircraft for those all-important panning shots.
The two HS-7954SH servos of the retractable landing gear are operated remotely with the use of a two position switch from the RC transmitter. The landing gear will lower and lock in the down position if the S800 goes into any type of safety mode (i.e. loss of RC signal which triggers an auto return home). The landing gear is easy to install, sturdy and worked flawlessly, no more “legs” in the field of view while shooting.
iOSD Mark II The iOSD Mark II On-Screen Display is specially designed for the WK-M autopilot system. The iOSD images are superimposed on the video streamed down from the aircraft; this enables the pilot to monitor real-time flight data from the WK-M while in-flight using First Person View (FPV). The iOSD can display a litany of information to the pilot to include, but not limited to, Power Voltage, Channel, Aircraft Distance to Home, Altitude, Control Mode, Fail-safe Mode, Pitch Attitude, Roll Attitude, Attitude Line, Airspeed, GPS Satellite count, Video Input and Vertical Velocity.
The iOSD can record all this information into a flight log which can be accessed post flight for review. My system has two cameras, one for FPV and another for video recording, the iOSD allows me to switch between the two video sources with a two-position switch from the RC transmitter. The iOSD is programmed and updated via an included USB cable.
5.8 GHz Video transmitter The 5.8 GHz 500mW system comes with a video transmitter, which includes a cooling fan, mounted on the S800 and slim compact ground receiver unit. Both units include small circular polarized antennas which provide good range and crisp video. The channels on the video transmitter can be changed by a three position switch on the RC Transmitter. The video receiver also has a button to access the 8 channels.
The video transmitter connects directly to the iOSD via an eight pin plug. The system comes with all the necessary leads to be able to construct a custom cable if not using the iOSD. Unfortunately the DJI 5.8 GHz video transmitter was not compatible with my 5.8 GHz Fatshark Attitude SD goggle’s receiver. To get around this problem I attached my Fatshark 5.8 GHz video transmitter to the output of the DJI video receiver.
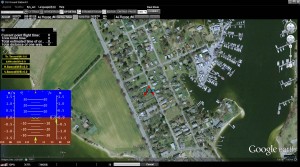
2.4 GHz downlink and Ground Control Station DJI offers 2.4 GHz and 900 MHz datalink to achieve long-range two-way communication; I’m using the 2.4 GHz system. The downlink allows the operator to view aircraft location, heading and altitude, as well as other flight data such as attitude, airspeed, vertical speed, throttle, pitch percentage and servo voltage at all times. This is all displayed on the DJI Ground Control Station (GCS) which is designed around a Google 3D map offering Geographic Information System (GIS) data. The operator can plan flight routes using a PC with 3D downloadable maps.
The automatic takeoff and landing feature can be applied using either the transmitter or the GCS via the keyboard. The operator can either use the keyboard or a joystick to control the direction and attitude of the S800. Up to 200 waypoints can be set up in the GCS with each waypoint being fully programmable with altitude, heading, airspeed, loiter, camera shutter control, etc.
There are many more features to the GCS, way too many to list here. For more information go to the DJI website to read an overview, download manuals and watch installation and setup videos.
IN THE AIR Assembly at the field or worksite is quick and easy. I keep my S800 in two large Pelican 1600 cases and can have it fully assembled and ready to fly in 10 minutes. First the landing skids are assembled simply be attaching the legs via one carbon fiber crossbar and plugging in the retract servos. Next the six arms are locked into place by a strong buckle, each arm and slot on the center frame are labeled with an X or O which makes distinguishing the placement of each arm a no-brainer. Then the center frame is placed on the locking levers of the H-frame, the top portion of the landing gear. The Zenmuse is placed underneath the S800 and attached via four rubber dampening mounting brackets. All that is left is to attach the GPS unit on its stand and strap the batteries to the battery tray.
Since all of the electronics, motors and propellers are fully integrated into the molded composite arms; swapping out an entire arm assembly (including Arm, ESC, Motor, and Propeller) can be done without tools in a matter of seconds. Having extra arms for quick replacements in the field is a good idea but can be expensive. When the battery is connected the LED unit provides the status of the GPS connection as well as the battery status. It takes approximately 5 seconds for the GPS to initialize indicated by blinking red and purple lights which will eventually turn to only a purple flashing light once the GPS has locked 8 or more satellites. I programmed the LED to turn yellow when the battery is getting low and then red when it is time to land. At that time the throttle end point will be reduced to 90%, which will start a descent but still allow for a slow climb if needed in order to provide some means of getting to a safe landing area.
The motor start sequence requires both transmitter sticks to be pushed to the bottom outside corners of the transmitter. The motors will start for 3 seconds, awaiting throttle input from the pilot. If no input is given the motors will stop. This is a safety feature provided by the WK-M to ensure that accidentally bumping the throttle will not start the motors.
My initial flights were in Atti. Mode, these were gentle lift-offs and landings, then progressing into a basic flight profile. This is a good mode to get a feel for how the S800 handles. Performing sweeping turns, figure 8s and buzzing around in this mode is exciting.
GPS Atti. Mode is much the same as Atti. except you have the ability to hold a position over the ground as well as the added return home features. This is a great mode for aerial photography and videography. The S800 was rock solid and held its position extremely well in 18 knot winds.
Flying in Manual Mode was a bit nerve wracking knowing that I had no attitude compensation at all. But the gently swept up arms make the S800 naturally stable and controlling it in this mode was not difficult at all. The S800 was design to be a stable aerial platform for professional level photography and videography, not for aerobatics. For this reason I did not try any hair-raising maneuvers, although at times I was tempted.
The WK-M controller also supports Intelligent Orientation Control, which allows the S800 to be flown in Home Lock or Course Lock. In Home Lock, all controls correspond as if the S800 was connected to the home location on a tether. For instance when I input aft stick for backwards flight no matter what the orientation of the S800 it will fly towards the home location which in most cases is where I’m located.
When flying in Course Lock, inputs of forward, back, left, and right will not be affected by the direction the S800 is pointing. So right is right no matter if the front is pointed towards or away me. Both of the functions can be turned on and off from the transmitter.
The newest feature of the WK-M is the Point of Interest (POI) mode. When the GPS signal is good, users can record the present position of the aircraft as a point of interest via a preset switch on the transmitter. The S800 can be flown in a circular flight path around that point with the nose of the aircraft locked on that POI. This function is easy to set up and convenient to operate, it is suitable for all-round shooting of a fixed scenic spot.
Another useful safety feature of the WK-M controller is the Fail-Safe mode. In this mode the S800 can be set up to either land at its current location or return to its home point and then land. The Fail-Safe Mode can be triggered by a loss of signal from the transmitter, one or more connections to control channels between the WK-M and receiver are lost or it can be activated by the pilot. When triggered, my fail-safe is programmed to hover at its current location for 3 seconds, then climb to 20 meters (if not already at or above that height) and return to the home point. Once at the home point it will hover for 15 seconds then slowly descend, land and turn off the motors. I am happy to report that this function also worked flawlessly. I use a similar return home feature on my other FPV airplanes and it has saved my bacon on at least one occasion so I’m glad to have it available on this model.
The S800 and WK-M have so many features it would be impossible to describe them all in this review. The user manual is very thorough and I had no problems following it. There is also a wealth of helpful information in online RC forums and DJI’s website. I suggest downloading the manual from the DJI website and studying it before the WK-M arrives; this will give you a good head start and a better understanding of this robust controller’s capabilities. I can sit here and tell you all the great things the Spreading Wings S800 can do but the best, and more fun, way to learn about it is to see it in action. Go to the website site and see for yourself, or better yet get to your local hobby shop and test fly it yourself. But I will warn that you may end up walking out the door with a few big boxes under your arms.
My S800 was experiencing excessive vibration which transferred to the IMU and caused altitude drops as well as unstable flight with associated white flashing LED indications. Some, not all, S800 users have reported the same problem. DJI has come up with a vibration absorber kit which is quick and easy to install. This completely solved the problem and now my S800 flies great. If you experience the same problem first make sure the propellers and motors are balanced, if the problem persists contact your dealer and inquire about the vibration absorber kit.
Conclusion The popularity of multicopters in past few years has exploded, lucky for us the technology required to successful fly these aircraft has kept up. DJI’s high-end hexacopter platform, the Spreading Wings S800, is designed for easy transportability and fast assembly. The S800′s highly-efficient dynamic system provides users with improved stability, greater payload lifting capability, and longer flight times. This system is ideal for aerial photography and cinematography. I’d like to thank Tony Ngo from RCRUS LLC in Riverdale, MD for all of their patience and outstanding help. They were available by phone, email and even Skype to assist with any questions or issues that arose throughout the entire project. Purchasing from an authorized DJI dealer who offers quality support with the ability to handle small questions to big problems will greatly help you maintain your S800 which directly leads to fun and successful flights.
Specifications:
MODEL: Spreading Wings S800
MANUFACTURER: DJI-Innovations (www.dji-innovations.com)
DISTRIBUTOR: RCRUS Radio Control Aircraft LLC (www.rcrus.com)
TYPE: Multi-rotor: Hexacopter
SMALLEST FLYING AREA: baseball infield
IDEAL FOR: intermediate to advanced
DIAGONAL WHEELBASE: 800mm
READY-TO-FLY WEIGHT: 12lbs 5oz. 16lbs 2oz (with Zenmuse and Panasonic camera)
RADIO: 6 channel minimum, 8+ channels recommended
BATTERY: 22.2v 6s 8000-12000Mah 25c
PRICE: S800 ARF ($1,900.00), WooKong-M Autopilot system ($1,159.00), Zenmuse Z15-G ($3,500.00)
GEAR USED
Radio: Futaba 9C, TLRS 12ch rx (S800): Spektrum DX8, OrangeRX 9ch rx (Zenmuse Z-15)
Motor: (6) DJI 4114 320kv Brushless Outrunner, (6) DJI 40a Opto ESC
Propeller: (6) DJI 15 x 4
Battery: (2) Turnigy nano-tech 6s 5000mAh 45C in parallel (www.hobbyking.com)
Autopilot: DJI WooKong-M flight control system
Camera gimbal: DJI Zenmuse Z-15G
Camera: Panasonic Lumix DMC-GH3 with 20mm pancake lens (www.panasonic.com)
FPV: Fatshark Attitude SD 5.8GHz goggles (www.fatshark.com), ReadyMadeRC Pico-Wide-V2 compact camera, 3s 450Mah lipo (www.readymaderc.com), DJI 5.8 GHz video system, DJI iOSD MARK II, DJI 2.4 GHz Ground Control Station.
Landing gear: DJI S800 Retractable Landing Gear
Accessories: Z15-G GH2-GH3 Conversion Adapter Plates, DJI vibration absorber kit
HIGHLIGHTS
+Extremely stable flight performance
+All inclusive ARF with quality hardware
+Integrated safety features
+LED provides instant status of system at all times
+Professional quality abilities at a fraction of the cost
By: Kyle Matthew
Photos by: Elizabeth Jenny









Can u put a switch on this drone for power up
Hi. Good article. I’m a long time user of the S800. I find that you can only fly it a certain way in the one person config. Hands off the rudder at all costs. It is an annoyance that I am trying to work to find a solution to. You have any advise?