This easy-to-fly hovering machine is perfect for a relaxing day at the flying field
When we first looked at the Next Level 650mm Quadcopter at RCX, we knew we had to have one. This aircraft would be the perfect platform to shoot some great low-level aerial photos and videos during event coverage. Now I am not a helicopter pilot, I only fly aircraft with wings, but I was assured that this quad was extremely easy to fly with the Naza system and that I would have no problem with flying it.
Minnesota Vikings Hybrid 2-Piece iPhone 5 Cover – Purple, Cheap Jerseys free shipping,Philadelphia Eagles 3-Piece BBQ Set, wholesale nfl jerseys from china, wholesale jerseys from china,Majestic Luke Kuechly Carolina Panthers Women’s Black Plus Size Fair Catch Name & Number T-Shirt., Cheap Jerseys free shipping
“Well,” I thought, “Why not put that sales pitch to the test?” So, we quickly ordered one and found out that the first shipment was sold out. Once the next shipment arrived at Innov8tive Designs, one was sent to us.
SPECIFICATIONS
- Model: Next Level 650mm Quad
- Manufacturer: Next Level
- Distributor: Innov8tive Designs (innov8tivedesigns.com)
- Type: Multi-rotor quadcopter
- Motor spacing, adjacent: 460mm (18.10 in.)
- Motor spacing, diagonal: 650mm (25.6 in.)
- Frame width, square: 510mm (20.10 in.)
- Frame width, diagonal 703mm (27.68 in.)
- Weight: 3 lb. 6oz.
- Motor req’d: Cobra 2217/20 (4)
- Radio req’d: 6-channel
- Price: $854 (GPS upgrade +$169)
HIGHLIGHTS
- ⊕ Very strong assembly
- ⊕ Easy to assembly
- ⊕ Easy to fly
- ⊕ Great aerial platform for photo/video
One of the first things I noticed when the package arrived was how neatly everything was bundled and labeled. All of the parts were in their own bags and labeled to match the instructions for assembly. The second thing was the quality of all the parts—the aluminum bars are thick and provide a solid framework for the quad motor mounts. The Naza multi-rotor controller and GPS unit are all top quality components along with the Next Level ESCs and Cobra motors. The build can easily be done by anyone with some modeling experience (or if you ever built a Lego set as a kid), thanks to the good-quality manual along with excellent customer service should you need assistance with items not covered in the manual. Now on to the assembly.
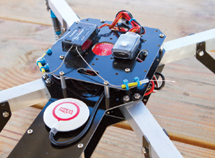
The Naza GPS unit is out in front along with the Futaba receiver and the Versatile Unit.
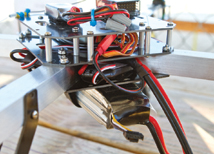
Everything fits within these two levels of the center plates. The battery is located on the bottom and easy to change out when needed.
IT IS A VERY GOOD IDEA TO KEEP AN EYE ON YOUR BATTERY LEVELS AND NOT TAKE A CHANCE WITH THE QUAD WHEN IT SHOWS SIGNS OF LOW BATTERY PERFORMANCE.
Unique features
The first thing is mounting the motors to the motor mounts that are fitted to the end of the aluminum arms. The motor mounts are made from thick, black fiberglass reinforced G-10 board with all the holes pre-drilled. There are two ways to mount the ESCs—on the outside attached to the arms or by running the wires through the aluminum arms and housing all the ESCs in the center section. This dictates how the motors are mounted to the mounts. I decided to have the ESCs on the inside of the center section of the aircraft, so I had to use some extension wires from the motor to the ESCs (available from Innov-8tive Designs). Once all of the motors are attached to the mounts and to the end of the arms, it is time to set the rotation and number the arms.
Before attaching the arms to the center plates, you need to decide which setup you will be running on your Quad, cross, or X-configuration. I went with the X-configuration that meant that the front left and the rear motors (1 and 3) are spinning clockwise, while the front right and rear left motors (2 and 4) are spinning counterclockwise. Take your time and make sure you have all the wires connected correctly and do a test run-up (without the props on) to make sure the motors are traveling in the right direction. Once everything is assembled, it’s a time-consuming process to disassemble the rig and reverse the wires on the ESCs if you set them up incorrectly.
Follow the tips on the instructions for attaching the arms to the center plates. This can be a rather cumbersome assemble and a second set of hands does make this an easier process. Between the bottom and top plates that attach to the arms, I have all four of my ESCs with the receiver wires coming out of the top plate and plugging into the Naza main controller. A third plate is attached on top of the controller with the wire that plugged into the Versatile unit and Futaba receiver sitting on top of that plate. Because I am using a Futaba S.Bus receiver, I only needed one wire connecting it to the Naza main controller, otherwise you would need to have six short servo wires connecting the receiver to the Naza unit. The GPS and compass module is also mounted on the top plate away from the motors to prevent interference.
IN THE AIR
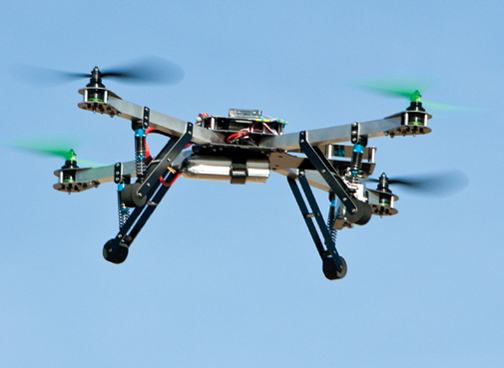
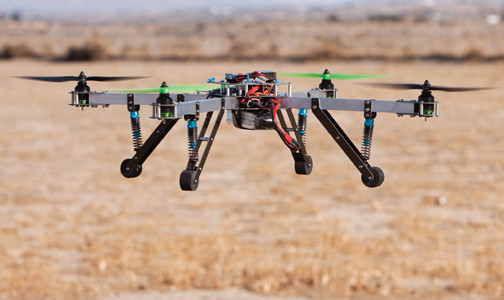
I found that the Next Level 650mm Quadcopter could take o from just about any surface as long as it didn’t interfere with the props. Just make sure you take o from a level surface to let the gyro set up correctly. I added the shock absorber kit on the landing gear; these give the quad a little softer landing, which is a good thing especially for a newbie quad pilot like myself. My first flight was uneventful and short, but the Quadcopter did perform solid in the air, and I didn’t have any problem handling it in future flights. Landing the Quadcopter was much easier than I thought it would be, and it just required a slight throttle increase just before touchdown to give a smooth, soft landing.
GENERAL FLIGHT PERFORMANCE
- Stability: Solid! The Naza system really makes this bird very easy to fly and even in light wind, the Next Level Quadcopter stays where you put it. Once set in a hover, you can just about let everything go and the aircraft will stay where you put it.
- Tracking: Again, the Naza system does a great job with this, as it keeps the quad level and heading in the direction you put it in. Even when using the rudder to turn, the quad stays level and does not drop off.
- Aerobatics: Yeah, right—don’t try this. This is not designed to be an aerobatic machine. This isn’t to say that you can’t perform some basic stuff with it, but I am not going to be using it for that.
- Glide and stall performance: There is no glide and stall performance with a quad multi-rotor aircraft. It is a very good idea to keep an eye on your battery levels and not take a chance with the quad when it shows signs of low battery performance. Land it right away.
PILOT DEBRIEFING
Quads are becoming the newest and greatest thing for many pilots, and we are finding many cool uses for this stable aerial platform. We mounted a GoPro camera to ours and got some nice flying photos and videos, which you can check out at ModelAirplaneNews.com. The Innov8tive Designs Next Level multi-rotor 650mm Quad is a very well-built and solid flying platform. This unit can stand up to daily use and the occasional bad landing. If you are looking for a strong quad-rotor frame with a very reliable flight system, this is the one you want.
GEAR USED
- Radio: Futaba 10C, R6108 SB receiver (futaba-rc.com), Naza controller and GPS (innov8tivedesigns.com)
- Motors: Cobra 2217/20 (innov8tivedesigns.com)
- Battery: Thunder Power 3-cell 5000mAh (thunderpowerrc.com)
- Prop: 10×4.5 Slow Flyer (innov8tivedesigns.com)
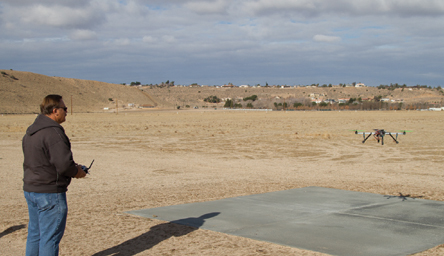
The author starting on the test flight. The Quadcopter is very solid in the air and easy to fly, even for a first-time quad pilot. The Naza system does a very good job of keeping this bird flying level.
Conclusion
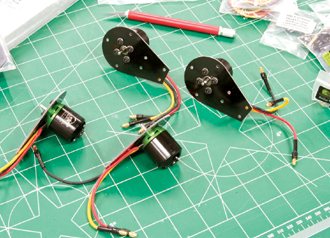
The first step in the assembly is to bolt on all the motors to the black fiberglass reinforced G-10 board motor mounts.
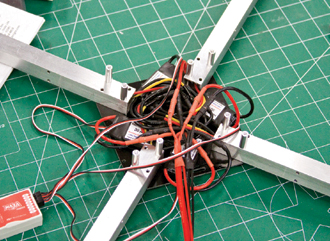
It is a rather tight fit with all four ESCs mounting in-between the center plates, but it does all fit in there and is a neat installation when done.
I had to download the Naza manual and program from dji-innovations.com. The assistant software is plugged into the Versatile unit and that allowed me to set up the main controller and the GPS/compass module for optimum performance on my quad. Total assembly only took about three evenings and another to program and set it all up. When finished, you have a very solid flying platform that is perfect for aerial photos or video and it is easy enough to fly—even for a fixed-wing pilot like myself.
Learning to Fly a Quadcopter
With new quadcopters coming out every month, it is obvious that they are quickly becoming popular with both heli pilots and fixed-wing pilots. If you have a helicopter background, you should have no trouble adapting to flying quadcopters. However, if you have a fixed-wing background, such as yours truly, you will have a much higher—but not impossible—learning curve to flying quads.
I started by first practicing on the RealFlight 6.5 simulator. I have to say that flying this one was very hard, and while it gave me some good stick time on a quadcopter, I did crash a lot. After a while, I was keeping it in the air with control and landing almost all the time.
Next, I purchased a 1SQ ready-to-fly quadcopter and flew that around the house, much to my dog’s displeasure (you can see that video on my blog on ModelAirplaneNews.com). I learned that this quad was much easier to fly than the one on the sim. The hardest part was needing to use the rudder stick as the main direction guidance for the quadcopter.
Then, the big day of flying my Next Level 650mm Quadcopter came. Much to my surprise, this was by far, the easiest quad to fly. Of course by then, I had a number of hours on the simulator and small quadcopter, but this made my first flight very enjoyable and I did not embarrass myself with a crash the first day out. Rather, I saved the crash for another day, which was a minor repair to the Quad, but a bigger hit to my ego. I can tell you that if you follow the method I did, you should have no problems getting into quadcopters.
By John Reid









Great review! I have flown numerous one, two and three wing RC planes over the years, would this be a hard quad for a first timer? Is it gps capable?
Again great review!
Kz