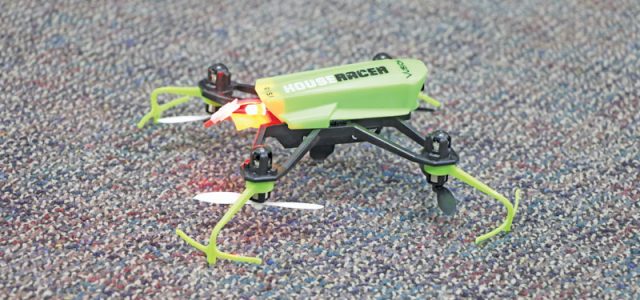
First-person-view (FPV) racing is so addictive and fun that, now, having a quick way to take that excitement inside will be a must-have for every racer I know. The new Vusion House Racer is not just for the diehard drone racer; this bird opens up the fun and excitement of FPV racing for everyone.

Highlights
The Vusion House Racer comes completely assembled with all the motors, speed controls, and FPV system set to go. Included are the completely assembled House Racer, prop guards, a 3.7V 650mAh 20C LiPo battery pack and USB battery charger, transmitter, FPV-RM2 monitor, and goggles. The first step, as with many drones like this, is to charge the battery pack. For the House Racer, this is accomplished by using any USB port on the computer to plug in the LiPo battery charger.

GATE KEEPER
The pylon gate that is included in the racecourse gate system is fairly large, so it’s easy to fly around using FPV.

PROP PROTECTORS
Even without the prop guards, the landing gear do good job of protecting the propellers.

The monitor can be attached to the transmitter or mounted inside the goggles to give a completely immersive experience.
Once that was done charging, I moved on to the sensor calibration of my transmitter to the House Racer. This is outlined in the manual and only needs to be done before the first flight. Most of the time, it is good practice to turn on the transmitter first. But if you don’t get the battery plugged in within five seconds (before the left LED on the transmitter stops blinking), then turn off the transmitter and then turn it back on.
The Vusion House Racer has three flying modes. Mode 1 has auto-level and mild roll rates and limited tilt angles—perfect for new racers. Mode 2 still has auto-level, but it has a higher roll rate and more control sensitivity, which is good for the experienced quad racer. Mode 3 has no limits on the tilt and roll rates, and the quad will not auto-level; this is for experienced pilots only. From there, it is only a matter of turning on the
FPV-RM2 monitor; if the video transmission is not coming through, just hit the channel button until you see the video image. The monitor can be attached to the transmitter or mounted inside the goggles to give a completely immersive experience. Once I had video, it was time to tear up the house.

The Racecourse
One of the other things that adds to the value of the House Racer is that you can fly it on the optional RISE racecourse gate system. This gives the course a realistic feel and really drives the competitive spirit. For $39.99, the FPV Race Gate System comes with three guide arrows, two ring gates, a pylon gate, and a checkered gate. (After all, you need to know who won!) These pieces are easy to assemble and very durable. The rings can be used on the ground or attached to the wall or ceiling, and are just the right size to make it challenging to traverse through. While this kit includes enough gates for a nice racecourse, it is easy to expand with additional items such as the RISE Arch Race Gate with flags, the LED Ring Gate, and the Elevated Race Gate. So go ahead and expand that racecourse and really tear up the house.

Setting Up the Video Transmitter
What makes FPV drone racing so fun and addictive is the ability to see and fly through the world from the cockpit point of view. It has been referred to as an out-of-body experience, and you will know the feeling the first time you pass yourself sitting there on the couch when your ship continues to fly down the hall. The Vusion House Racer comes with the camera and video transmitter installed, so you just need to make sure that they’re on the same frequency. If your goggles are on one band and the House Racer is on the other band, then you will not be able to see through the camera. There is a quick fix to that: Switch the camera button on the bottom of the House Racer to change to a different FPV frequency band. Just press the button and run through the channels on your goggles until you can see an image; if that doesn’t work, repeat as needed until you get a clear signal and picture. This may also be necessary if you’re flying more than one House Racer; each will need to be on a different band/channel.

The complete package has everything you need to get started racing and tearing up the house.
Aerial Recap
For a small quad, the Vusion House Racer is a very stable bird in modes 1 and 2. If you ven-ture to mode 3, just make sure that you are a good pilot because you will be completely in charge of that bird. To fly, the first step is to calibrate the transmitter before the first flight. After that, I plugged in the battery pack on the House Racer, set it down on a flat surface, and then restarted the transmitter. The House Racer armed immediately. To get the motor to arm, I just pushed the left stick to the bottom right; disarming is the same stick pushed to the bottom left. I throttled up and got the racer up to about 3 to 4 feet before flying it around the house.
Two things make this a fun bird to fly. It is very stable and durable, which means that flying it was easy and it stayed where I flew it. It drifted when the sticks were left at center, but this was a slow drift that was easy to correct, and it was simple to stay on top of it. I also bounced off the walls a few times with no damage to the quad or marks on the walls, and I was able to keep flying after the hits. The quality of the image in the FPV-RM2 monitor is quite good, and it was easy to fly the House Racer around by just watching that screen. Flying FPV around the house, of course, is a little challenging, but at the same time, it is a whole lot of fun.
Bottom Line
Even if you are not into FPV racing or a diehard racer, or even if this is the very first time you have ever flown a quad, you will have a lot of fun with the House Racer. Having one of these racers for each family member will make for a great evening of fun. But I warn you now, you will need a lot more batteries!


