Most of the videos that you view online today have a lot in common: They are shot on a digital video camera, are cut together to some music, have had some titles added, and are compressed and then uploaded. The online audience has an insatiable appetite for aerial footage, and you want to make sure that your content looks as appetizing as possible. We’re going to discuss some techniques that, with practice and patience, will give your videos the cherry on top to stand out among all the other eye candy.
INTRODUCTION TO COLOR CORRECTING
Standard shooting
Most of us purchased a traditional camcorder-type camera or one of the many popular action cameras to capture life’s moments. The average consumer will take the camera out of the box, charge the battery, insert a storage card, and start shooting without changing a single setting. This method produces satisfactory results for most, and if you fall under this category, there is absolutely nothing wrong with this approach. If you’re more of a “prosumer” or an aspiring cinematographer who likes to take advantage of all the features of the camera you paid for, then you might have noticed that the camera has much more to offer.
Depending on the type of camera you shoot with, you might have different user-selectable modes that alter how the video is recorded; they could be named something as simple as “vivid,” “cloudy” or “cinema.” These settings make certain assumptions for you, such as shutter speed, white balance, and ISO (sensitivity to light). All of the camera presets have their own pros and cons, and for most videos that go straight from camera to YouTube, you probably won’t need anything more. Those of you who are willing to spend some time in postproduction, should do yourselves a favor and find the mode on your camera that gives you a very low-contrast, low-saturation image, which is commonly referred to as “flat.” Some of the most popular “aerial-friendly” cameras on the market allow you to control how flat the image is captured. On GoPro, there is a setting called “ProTune”; with Canon, it’s “Log”; and DSLR has “CineStyle.” The correct term for this look is “Log” (logarithmic).
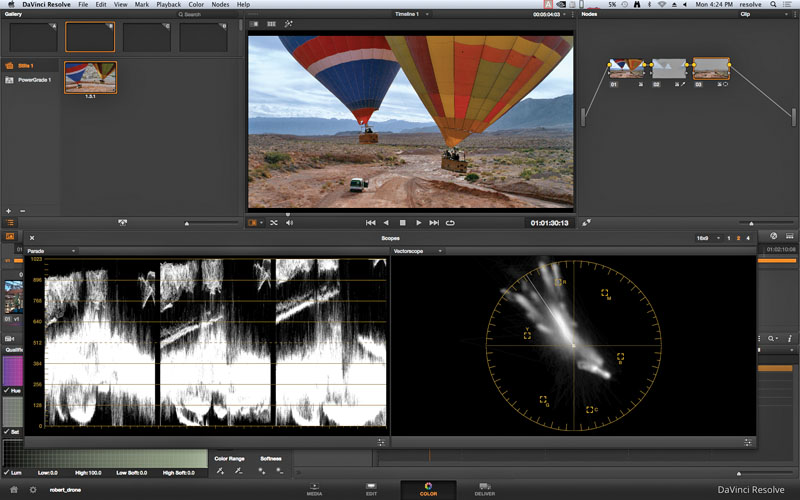
It’s very important to spend time understanding how to read scopes if you want to successfully balance an image and learn to make shots match. In this image, you can see that the shot is pretty well balanced.
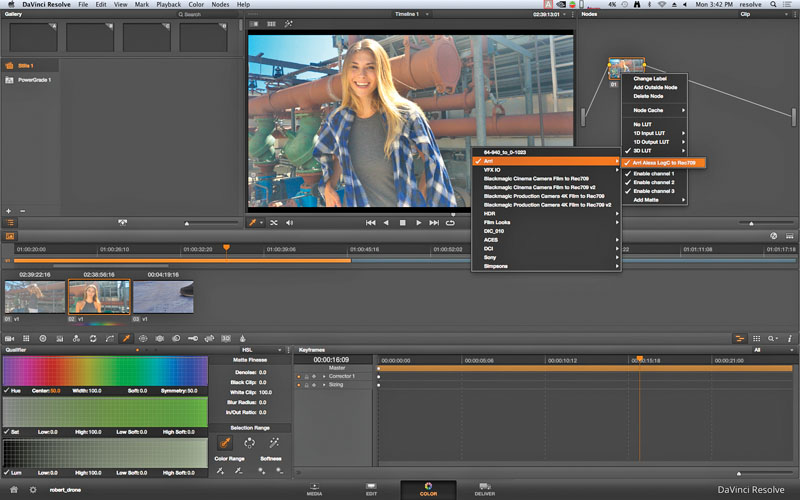
Resolve offers a lot of contextual menus to make tasks such as applying a LUT as simple as a right mouse click. Here, we applied an ARRI LOG-C to REC709 to material shot on a Panasonic Lumix GH4.
Why shoot flat?
When most people try shooting flat, they usually think, “Why would anyone ever use this mode? It’s horrible!” Even producers who see Log on set for the first time say that. I won’t get into the technical details or the color-science explanation behind Log here, mainly because we don’t have the space. If you’re really interested, there are some great online resources to satisfy your curiosity.
All modern, high-end production cameras can capture video in Log. They each have their own interpretation of Log, but for the most part, the image is captured flat and desaturated. Arri Alexa calls its version “Log C,” and Sony refers to its version as “S-Log”; by the time you read this, you might have heard that Panasonic will be releasing “V-Log” for its aerial-friendly 4K camera, the Lumix GH4. DJI also recently announced the availability of an upgraded camera for the Inspire 1 called the X5 and the X5R. The X5R will be capable of recording in Raw using DJI’s version of Log called “D-LOG.”
What is “Log”?
Log might not, at first, be pleasing to the eye, but you’re seeing a canvas that offers you an entirely new level of detail; each pixel is just waiting to be painted! After you’ve spent some time in color correction, I promise that you’ll enjoy shooting this way and that your productions will benefit greatly from this approach.
Color correction for video is similar, if not identical, to what you can do with still photography. If you shoot stills in Raw, you’re already familiar with the concept of Log: You take a Raw still into an editor such as Photoshop and add contrast, saturation, and filters. Guess what? It’s the same concept to color-correct video. If you’ve shot simultaneous RAW and JPEG files on your still camera, you’ll notice that the JPEG images have more contrast and saturation than the RAW. That is an example of using a LUT (lookup table). (More on this later.) If you’re a still photographer, you are likely familiar with the concept of using a histogram to ensure a properly exposed image. We can’t discuss color correction without bringing up the importance of learning how to use scopes, like a histogram.
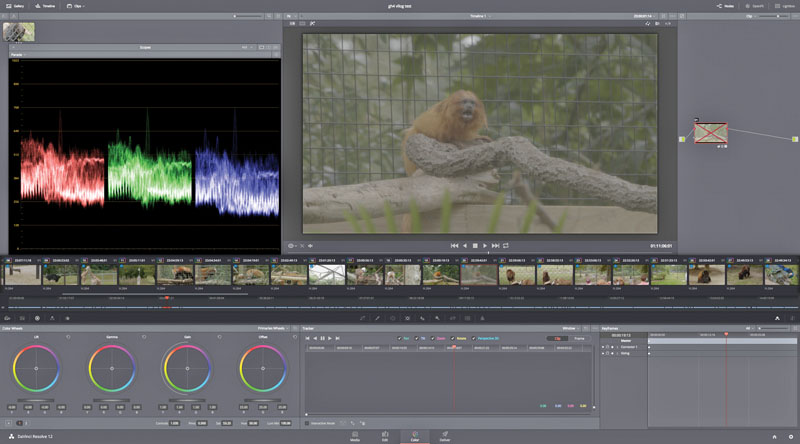
Lookup tables (LUTs) are nondestructive when used within the software, meaning that you can apply them to a shot and remove them without “baking” any color into the clip unless you want to.
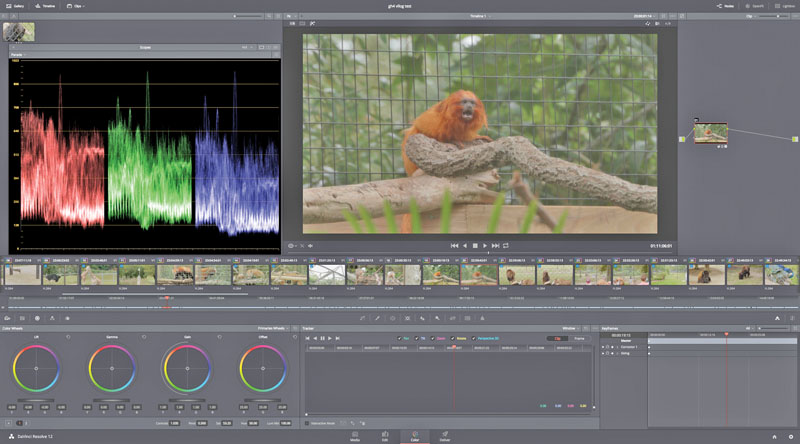
The effect is similar to shooting stills as Raw+JPEG. The Raw image is flat, and the JPEG has a LUT applied to make it look “normal.”
Why shoot flat?
When most people try shooting flat, they usually think, “Why would anyone ever use this mode? It’s horrible!” Even producers who see Log on set for the first time say that. I won’t get into the technical details or the color-science explanation behind Log here, mainly because we don’t have the space. If you’re really interested, there are some great online resources to satisfy your curiosity.
All modern, high-end production cameras can capture video in Log. They each have their own interpretation of Log, but for the most part, the image is captured flat and desaturated. Arri Alexa calls its version “Log C,” and Sony refers to its version as “S-Log”; by the time you read this, you might have heard that Panasonic will be releasing “V-Log” for its aerial-friendly 4K camera, the Lumix GH4. DJI also recently announced the availability of an upgraded camera for the Inspire 1 called the X5 and the X5R. The X5R will be capable of recording in Raw using DJI’s version of Log called “D-LOG.”
What is “Log”?
Log might not, at first, be pleasing to the eye, but you’re seeing a canvas that offers you an entirely new level of detail; each pixel is just waiting to be painted! After you’ve spent some time in color correction, I promise that you’ll enjoy shooting this way and that your productions will benefit greatly from this approach.
Color correction for video is similar, if not identical, to what you can do with still photog-raphy. If you shoot stills in Raw, you’re already familiar with the concept of Log: You take a Raw still into an editor such as Photoshop and add contrast, saturation, and filters. Guess what? It’s the same concept to color-correct video. If you’ve shot simultaneous RAW and JPEG files on your still camera, you’ll notice that the JPEG images have more contrast and saturation than the RAW. That is an example of using a LUT (lookup table). (More on this later.) If you’re a still photographer, you are likely familiar with the concept of using a histogram to ensure a properly exposed image. We can’t discuss color correction without bringing up the importance of learning how to use scopes, like a histogram.
Getting the right color
Scopes are the only real way to ensure that your color is accurate. RGB Parade and Vectorscope are the two most common scopes you’ll come to rely on for color. You will quickly find out that you can’t trust your eyes alone when coloring your footage, but it’s easy to access scopes in most color correctors.
It’s important to note that you should do yourself a favor and never trust auto white-balance on your camera. If your camera offers a way to manually white-balance, take advantage of that feature. If you’re shooting with multiple cameras, make sure that you white-balance all cameras to match. This step alone will make your work much easier. Even if you aren’t going to color-correct your footage, you should always manually white-balance your cameras.
The basics
Now, let’s begin your first steps into the world of color correction. Believe me when I tell you that it isn’t as difficult as you might think. There are many tools to use for color correcting video; some you might already own. They look intimidating, but once you understand how to navigate the basics, you’ll see how intuitive these applications can be.
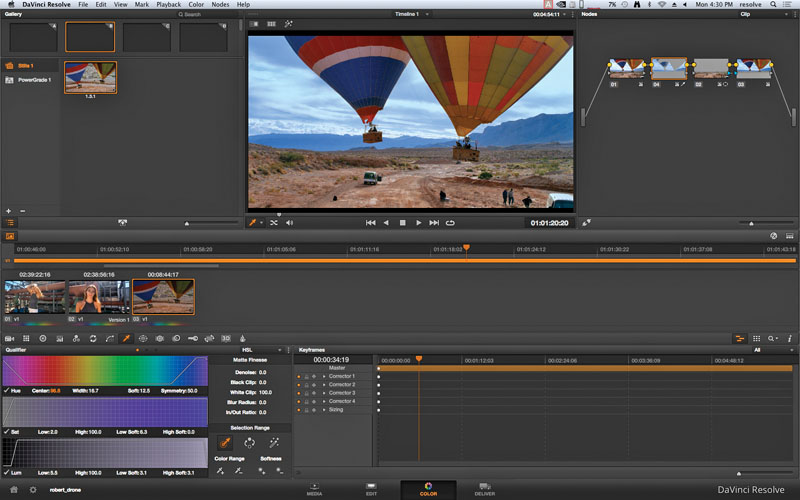
Most editorial software have a basic color tool set, but there are some color-specific applications that you should learn. One of the most widely used applications is DaVinci Resolve, made by Blackmagic Design; the Lite version of it is even free! Resolve has been used on multiple television shows and feature films. If you master Resolve, you could find yourself working in Hollywood one day!
Let’s start with the basics. Load up a clip into Resolve, and apply a LUT. Think of it as a video or still filter similar to what you apply on Instagram to quickly modify your image. You can add a LUT to your Log video, and it will instantly add contrast and saturation, making it look similar to what you shot normally before you discovered Log. For those of you itching to know what most common “non-Log” foot-age is called, it is Rec. 709 (the format most Americans watch on TV). For a lot of you, adding a Rec. 709 LUT to your Log footage might be all that you need. If you’re capturing footage to turn over to a client, the LUT applied gives you the confidence to know that your footage will look amazing once it’s fully color-corrected.
Now that you have a basic understanding of what you can accomplish by shooting Log, go out and shoot some flat footage, download DaVinci Resolve Lite (for free from blackmagicdesign.com), and familiarize yourself with the interface.
Behind the scenes
If you’re still with me, let’s discuss what the LUT just “automagically” did for us. To fully understand what the LUT is doing, let’s manually add some color to get from Log to Rec. 709. Rec. 709 describes the contrast, color, and saturation that you’re accustomed to watching on your TV.
Create a timeline in Resolve, and move into the proper toolset and window layout for color correction. For the best results, you’ll want a dual display setup, but you can accomplish the same results with one screen. Resolve does a great job of keeping the layout clean in both single and double window configurations.
Now, let’s discuss some of the benefits of color correcting your footage. The first reason should be obvious: It just looks better! Even if you don’t shoot Log, you can still take advantage of color correction to balance out your video and to apply some techniques such as vignettes to focus the viewer’s attention on a certain part of the screen as well as color isolation and windows to brighten up that slightly overcast sky.
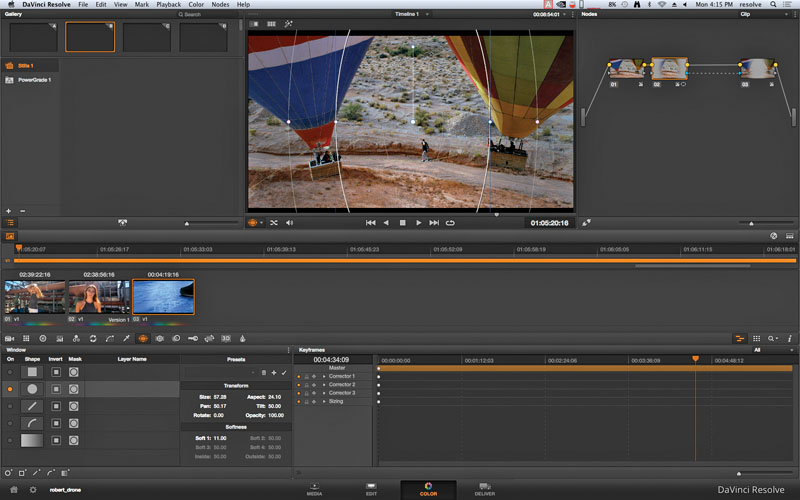
Vignettes and windows are tricks of the trade to help you focus the audience’s attention to a specific part of the screen.
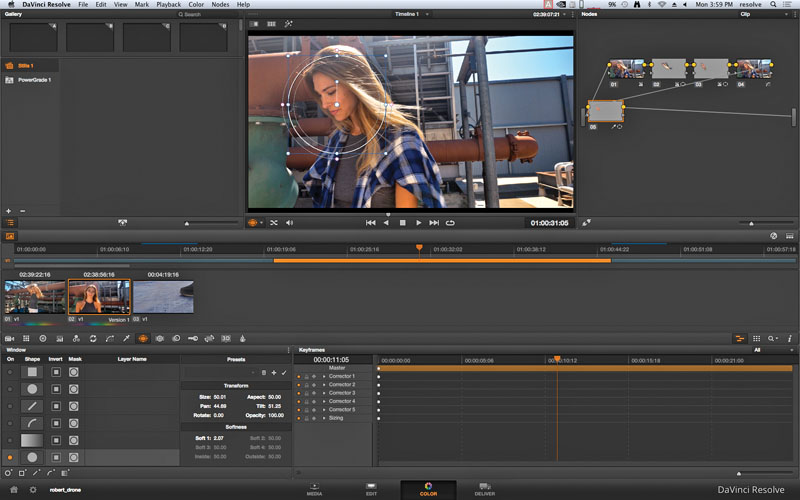
Power Windows in Resolve is a predefined (or custom) shape that allows you to enhance color either inside or outside of the defined area. This is especially helpful if you want to draw attention to a specific area of the shot.
Beauty fixes
Color correction can also be used to clean up uneven skin tones or make simple “beauty fixes,” such as the removal of blemishes from an actor’s face. There are tools so powerful in Resolve that you can track a blemish on a face with an incredible level of accuracy and paint it out. While you’re at it, you can isolate the skin tone of your actor or actress and add a little softening to the skin tone to give it that flawless porcelain look.
A lot of the tools available to you in these applications have practical shot-saving purposes. You might find that your highlights are clipping in your footage. You can easily select one of the available shapes to use as a window on your footage or free-form draw a window to select and adjust a problem area. Windows are also useful to selectively bring out more detail in certain areas of a shot that you want to enhance, such as a face that might have been obscured by a shadow. Once you get familiar with using windows, you’ll quickly discover that your video is an entire new canvas on which to paint. People, however, tend to abuse these tools. Use windows when necessary to enhance your video, but don’t overdo it.
The sky in this image might look unnatural, but it’s used to highlight the fact that, with time and practice, you can learn to isolate and affect a specific color range.
Matching light
One of the biggest challenges when editing a show is matching two shots from two different times of day. This also happens to be one of
the biggest advantages of color correcting
your footage. In many productions, scenes are shot out of context. It’s not uncommon to shoot a scene at 9:00 a.m. and continue to shoot coverage for it later in the day. As you know, light changes throughout the day, and you might be faced with some challenges trying to make it look like it was all shot at the same time of day.
How do you match the lighting and shadows of 9:00 a.m. to the low light of 5:00 p.m.?
The answer typically involves a strong editor, who cuts around as many challenges as he or she can, along with some color correction to make it all look as if it were shot in a five-minute window. Situations like this are where shooting Log really reveals its benefits. By capturing the entire possible dynamic range, you’re not clipping the color potential. You have more details available to you in the shadows to bring up—and don’t forget those windows we discussed earlier.
I sincerely hope that you are able to take this information and pursue some additional research and apply it to your work.

You can see from the ground in the images above that with some color correction, you can closely match two different times of day.


