

Building stuff is fun. Building stuff that works is better. Websites like Thingiverse, YouMagine, Cubify and MyMiniFactory offer a variety of projects for your 3D printer. What they don’t provide are any guarantees that your creation will perform as advertised, especially when various electronic components are required. Maybe the servo that you bought is slightly different from the one you needed. Or the circuit board has the right technical specifications, but it’s of a newer model with the holes and pins at different places. There are few things more frustrating than finding out those parts you bought don’t actually fit together.
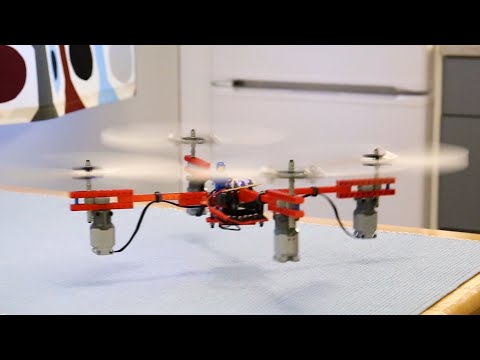
Quadcopters are a staple of 3D printing project repositories, so I decided to build one for the purpose of this article. I settled on a slick-looking project offered on TinkerineU (u.tinkerine.com). Tinkerine is a Canadian 3D printer manufacturer, and this website launched in March and is still in its infancy. Most consumer-oriented 3D printer companies have some kind of website offering projects and STL files of stuff that their customers can make. Unlike Thingiverse, which hosts user-generated content, TinkerineU is marketed as a teaching platform, with professionally designed, high-quality projects and lesson plans aimed at schools. In fact, the press release states that the content was co-developed with educators.
Lesson 1: Appearances can be deceiving
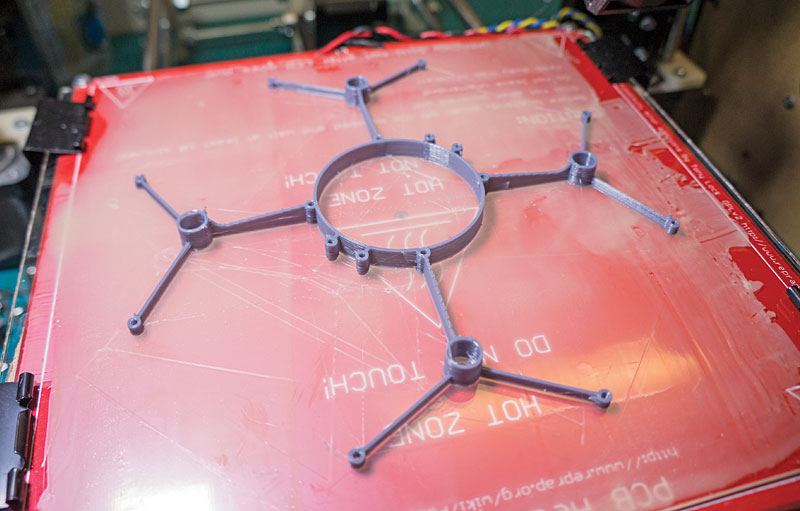
The project STL files for the TinkerineU quadcopter comes with an instruction manual. It’s all very clean and official looking; I can tell serious man hours went into this. Diagrams show how to put the various parts together, what kind of screws and size motors to use, and where the circuit board goes. I feel that I’m in good hands.
But as legitimate as the document looks, I can spot some flaws. No model number or clue where to buy the motors and no recommended electronics. I’m even expected to 3D print the propellers, which is something I know for a fact is near impossible. Could a high school student build this? Unlikely! But I decide to go ahead anyway … because if it’s too easy, I won’t have anything to write about!
Lesson 2: Locate the hardware first
On the TinkerineU website, the link for locating the hardware that I need is grayed out, with the dreadful mention, “coming soon.” I inquired about that and Tinkerine replied that they are “currently working diligently with […] suppliers to have the hardware parts for all the projects available. It shouldn’t be much longer.” That was back in March, when the website was launched, and nothing has changed since. Good thing I didn’t wait!
Thankfully, this mini quadcopter uses brushed motors identical to the common Hubsan brand that you can buy online. Brushed motors don’t use electronic speed controls, so one less thing to worry about. I figured out that I need the exact same motors as the Hubsan H107L. Replacement motors are easy to find online ($10). They have to be for that exact model, though, since the more recent ones use bigger motors. I also buy a Hubsan flight controller board ($14), which has the radio receiver built-in, and four propellers ($5), because I figure the ones I will try to print aren’t likely to work. I already own a Hubsan, so I have a remote control and battery. The instructions recommend a 300mAh 1S LiPo. I’ll use a 500mAh, because why not? I’m basically building a Hubsan H107L from spare parts in a custom 3D-printed body.
I picked a project with challenging fine features. 3D printers are not all the same. Your results may vary if you are using a different machine than the person who designed the project in the first place.
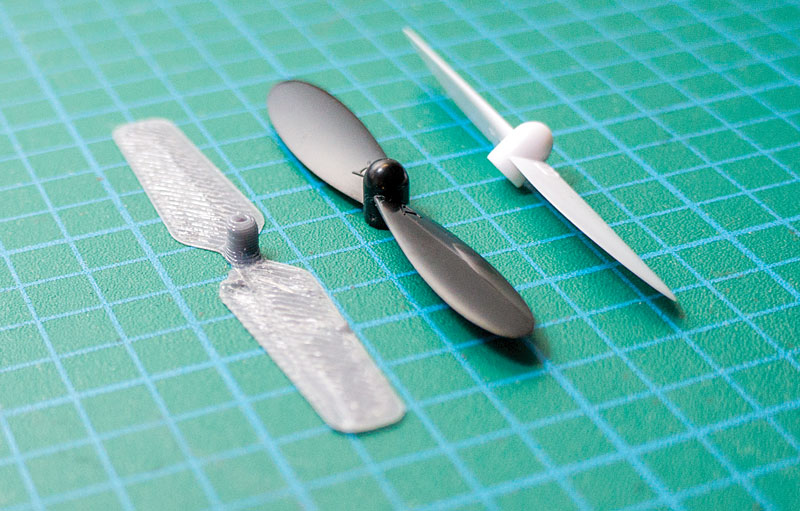
It may be possible to 3D print a propeller, just not such a small one. This one (left) doesn’t look too bad, but it’s far too flexible and I have no practical way of shaping it to give it the right pitch. I’ll go with the ones that I bought (right).
Lesson 3: Can your printer handle it?
I have plenty of time to print the actual frame while my hardware ships across the ocean. My first attempt is a disappointing failure. You see, I don’t own a Tinkerine printer. Mine is a DIY RepRap with a different set of characteristics. The project is tailored for the company’s printer, which probably handles fine features better than my contraption.
No panic! A few calculations and a quick tuning later and I’ve got the layer width of my printer just right. I’m not able to get it precise enough to print all the tiny locking pins this frame is supposed to have, but I figure I can use epoxy glue … This is as close as I can get it.
As for the propellers, I printed one just for the sake of it. It came out better than expected, but in no way strong enough to lift the aircraft. The instructions come with the mention: “The blades of this propeller are printed flat and must be bent after printing to create the desired pitch.” No clues on how to achieve that and I will be in awe of anybody who can pull it off. I’ll just use the ones that I bought.
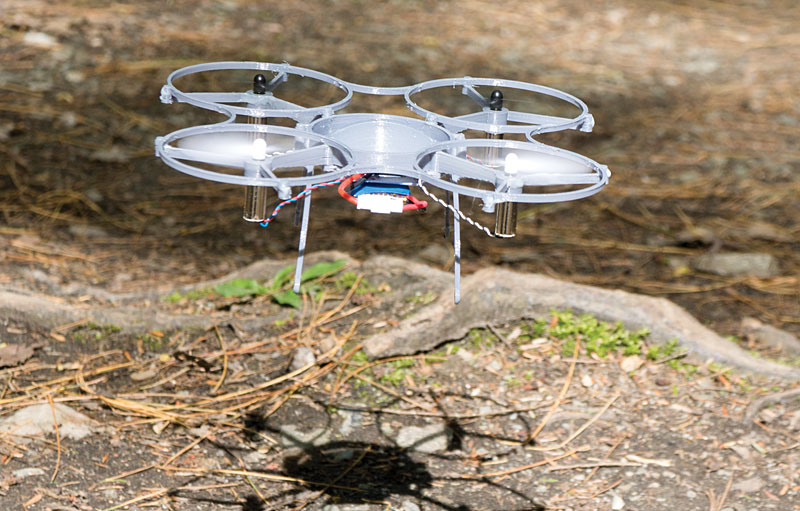
At the end of the day, my 3D-printed mini quadcopter is the same as the Hubsan H107L, but with a custom frame. This is a fun project if you happen to have a broken Hubsan lying around.
Lesson 4: You are on your own
I located the tiny screws needed to put it all together, but the very first part that I try to attach cracks. My delicate print, coerced from my barbaric RepRap machine, isn’t going to cut it. Time to improvise! I dismiss the screws and glue everything with epoxy. At this point, I just want it to fly.
And fly it does! About as well as the Hubsan H107L, whose guts I Frankenstein-ed to life in this new body. The project worked … after a fashion.
There are a lot of ways this could have gone better. Owning a superior 3D printer would have been a plus. It would also help if Tinkerine sold hardware kits for its projects.
3D printing has true potential when it comes to teaching things like physics, mechanics, and electronics. My goal isn’t to discourage you from exploring projects found online and attempting to build them. But you will need to be clever and remain skeptical in the face of things that look too good to be true.
Search & Discover
How can you find good projects? There’s a search engine for that! With possibly dozens of online repositories of 3D printing projects, finding the very best is near impossible without help. I use STLFinder.com and Yeggi.com, two search engines especially made for sorting through several resources at once.
Precursors to Failure
1. No actual real life pictures of the finished project.
2. Absent or incomplete list of required hardware.
3. No links to the stores where the electronic parts can be found.
4. No details or assembly instructions.
5. No comments or pictures from other users who built it.
6. STL files containing errors (non-manifold, intersecting triangles).
7. High detail and/or overhanging parts that look like they could only be printed on a high-end machine.
8. The title reads “NOT-TESED” [sic].
9. The title contains an obvious typo.
10. This is the very first posted object by this user.
By William Levasseur Photos by William Levasseur & Chantal Racette